EN
EN
 AR
AR
 BG
BG
 NL
NL
 FR
FR
 DE
DE
 EL
EL
 IT
IT
 KO
KO
 PL
PL
 PT
PT
 RO
RO
 RU
RU
 ES
ES
 TL
TL
 IW
IW
 ID
ID
 UK
UK
 VI
VI
 TH
TH
 FA
FA
 AF
AF
 MS
MS
 SW
SW
 BE
BE
 UR
UR
 BN
BN
 KM
KM
 LO
LO
 LA
LA
 MI
MI
 MN
MN
 MY
MY
 KK
KK
 MG
MG
 SU
SU
 TG
TG
 UZ
UZ
 KY
KY
 XH
XH
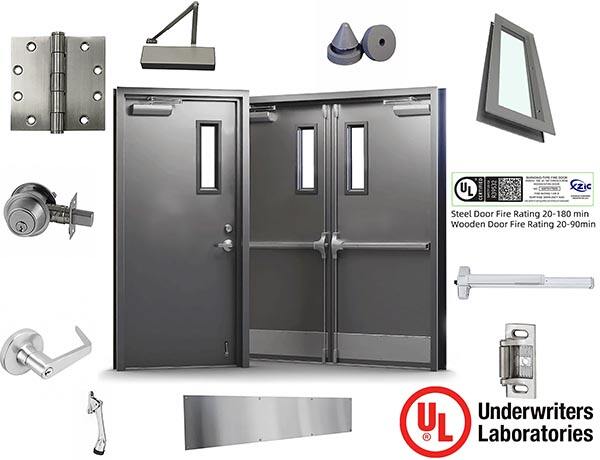

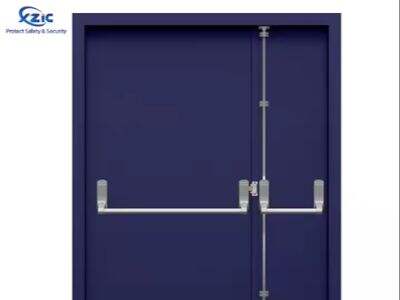
Installing a fire door panic bar is simpler than it may appear to be. Panic bar is a vital safety device supporting common people in quick safe exit from inside the building in event of an emergency like fire. The lever makes it easy for people to exit from the building in case of an emergency and that is how they are able to open the door without any difficulty. This is an easy DIY to show you how to install a fire exit door with panic bar by XZIC so keep on reading the rest of the article.
1. Pick the Right Bar
You need to start by looking for the panic bar for your door in first place. The bar should slide snugly into the door frame; no more than 1/8 inch clearance at each end of the bar is permissible. This is something you can verify by looking at the box or the packaging; it should specify whether it has been rated as safe for a fireproof doors and meet all necessary safety standards. If you are unsure, either ask someone more experienced or look online for help.
2. Measure and Mark the Door
You will need to test where you want the panic bar placed on your door and mark it for installation. Approximately 40 inches from the floor. This is an important measurement that gives the height where panic bar should be positioned at to make it easily accessible. Use a pencil to mark this location so it is easy to see where to mount the bar. Check to see if the marks are straight with a level. A level is a device that tells you if something is straight or not.
3. Drill Holes
Now you get your drill and start making holes on the door that the panic bar will be mounted. The install step is quite crucial so be sure to go through the installation instructions to understand where you need to drill exactly. Drilling in the wrong place can cause headaches later on. Have the appropriate-sized holes drilled out for the screws you'll use. The drill bit should be sized to the screw, or just a little narrower.
4. Attach the Bar
With the holes drilled, you can now attach the panic bar to the door. Attach the panic bar and align the holes in the bar to those in which you put them on the fire doors. This is important because the bar should be hold tightly. Secure the panic bar and door with screws. Ensure everything is in order and ready to function efficiently whenever called into action.
5. Test the Bar
Last but not least, you should test the panic bar door to confirm whether it is functioning or not. If the door will easily open, nudge the crowbar. Opening it should be effortless. If you run into any problems, you may have to alter the bar. Lock the door securely and double check that it closes completely upon completion. This is actually a mandatory one because everybody inside the building must be safe.
Install a Fire Door Panic Bar in Just Four Simple Steps
Why Is Fire Door Panic Bar So Important? It is super easy to install and can be done yourself. The effort is a tiny one that would mean the world to everyone's safety. In order to provide some help to make the installation process easy, here are a few tips for you:
1. Read the Instructions
Step 1 — Read instructions before you begin. They will inform you all about how to install the panic bar property. If you know the steps in advance, it will be easier to go through.
2. Get the Right Tools
Its a lot easier and faster when you have the right tools. This job requires a drill, and assorted size bits, screws and a level. Ensure you have everything you need to start working, so that you do not have to go looking for something in the middle.
3. Measure Twice, Drill Once
When it comes to measurement, always cross-reference. Measure the height of the door with care and from a distance above the ground. Trace the location of the panic bar on the door (cross verify measurements before drilling). By taking your time at this step, you can avoid mistakes.
4. Take Your Time
One need to be slow and can do with some work in a proper manner. Hence, if you hurry up the installation process, it could lead to errors, which in turn can affect the smooth operation of your panic bar for emergency situations. Simply follow all the instructions one by one and go on easy on yourself.
5. Test the Panic Bar
As important as you have installed the panic bar, it is very essential also to be tested so it works perfectly. Give a good push against the bar and try to open it. Check whether the panic bar functions well and if not, you need to change or adjust it.
Fire rated door panic bar installation is easy
A fire door panic bar is just one of many things that can be built and this is why it is a simple home build compared to other types of home building. However, it comes with a few demands that you should also fulfill to ensure the installation of panic bar is well done and works as intended. So with that in mind, here are 4 key takeaways to note.
1. Choose the Right Panic Bar
Make sure that you select a panic bar that is compliant with all safety regulations and compatible with a fire door. The panic bar must be the correct width for your door otherwise it will not operate properly.
2. Follow the Instructions
Read the installation instructions carefully at all times. If you receive a panic bar when shopping for one, the instructions will also direct you on where to correctly place the panic bar and how it should be installed. Rules are there to be followed so as to ensure the safety.
3. Use the Right Tools
Get the right tools for the job Drill Bit Screws Level. Knowing the perfect tools to install will ease and quicken your task.
4. Mount the Panic Bar Rightly
Position the panic bar measures up 40 inches from the floor in the door. It has to be well-balanced and properly organized with this flip-up doorstep. It sits in a place where anyone will be able to use it.
5. Test the Panic Bar
After the installation of the panic bar, do not forget to test it to see if it functioning adequately. Push on the bar, and confirm that the door opens readily. It is crucial to the safety of all.
Fire Door Panic Bar Installation Quick Fixes
A fire door panic bar is nothing more than a primitive form of safety that protects life from catastrophe and Fire. You can install a bar in minutes and it should be taken to ensure that your dog is safe. How to onboard successfully installation can be a breeze or a pain.
1. Choose the Right Panic Bar
Ensure the panic bar you pick meets all certifications for fire door use. If you are unable to find this information on the packaging consult with a professional.
2. Measure and Mark Carefully
You must measure the door carefully, and indicate where the panic bar will be. Now it is time to check that the lines you have drawn are level and straight. This saves you from failure in the installation process.
3. Drill with Care
Get the proper size drill bit and be sure to drill straight. Make sure you drill straight and do not create any chipping on the door. This will allow for a clean and professional-looking installation when the job is done correctly.
4. Use the Right Screws
Use the screws that come with the panic bar or screws appropriate for the door. Gauging screws can affect how well the bar works.
5. Test the Panic Bar
Test the panic bar to make sure it was installed in a proper manner post installation. See that the door opens and keeps wonderful, and is the lid working. Safety starts and ends with testing.
Conclusion on Fire Door Panic Bar Installation
In conclusion, setting up a fire door panic bar is an effortless and helpful investment in the security of your property or corporation. Make sure to find the perfect panic bar and measure and mark conscientiously in order to adhere properly to installation instructions. You also need to try the panic bar so you are going to know whether it is functioning appropriately and carry out routine maintenance on it when necessary. The installation of a panic bar that ensures the safety of soft targets in a worst-case situation. By adhering to the tips in this guidance, you can rest assured that you are one step closer towards securing your home. And do not forget that you certainly will find the necessary help to install fire door panic bars.